

First, rest assured that installation of the Japanese language and changing your system locale settings to Japanese (Japan) does not change your PC's system language completely; it remains in your language. The installation simply adds an extra language to your computer so that the game plays without problem.
According to your OS, complete the change to Regional and Language Options (see the following).
Please note that if you encountered an error with a particular file, you need to do the following in addition to the language settings:
- Delete the downloaded file from your PC before you configure the language settings.
- Download the file once again with the new language / system locale settings.
Windows 8.1 and Windows 10
-
- Press the Windows key, type 'control panel' and open the Control Panel.
- Click on Clock, Language, and Region / Clock and Region, then on Region.

- Click the Change system locale... button in the Administrative tab (rightmost tab).

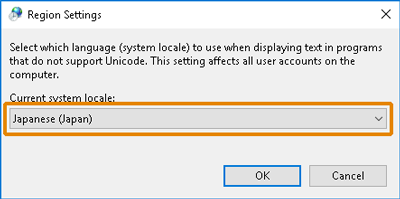
- On Region Settings window, click the drop-down list for Current system locale.
- Find and select Japanese (Japan).

- Click OK and confirm changes. Restart PC so that the update takes effect.

If Japanese was not in the drop-down list, please follow these instructions:
For Windows 10:
only proceed if you've tried the above method!
- Press the Windows key, type 'settings' and open Settings.
- Click on Time & Language, then on Region & language.
- Under Languages, click the Add a Language button.
- Find and click on Japanese in the list, then on Next.
- On Install language features, please untick unrequired features. We recommend unticking Set as my Windows display language.
- Click Install.
For Windows 8.1 and earlier versions of Windows 10:
- Press the Windows key, type 'control panel' and open the Control Panel.
- Click on Add a Language under Clock, Language, and Region.
- Click on Add a Language on the Language window.
- Find and click on Japanese in the list.
- On the Language window, click on the Options button to download and install the Japanese language pack.
Windows Vista / Windows 7
- Click on Start then Control Panel.
- Click on Clock, Language, and Region, then on Regional and Language Options.
- Click the Change system locale... button in the Administrative tab (rightmost tab).

- On Region and Language Settings window, click the drop-down list for Current system locale.
- Find and select Japanese (Japan).

- Click OK and confirm changes. Restart PC so that the update takes effect.


If Japanese was not in the drop-down list, please follow these instructions:
- Click on Start then Control Panel.
- Find Windows Update and select Check for Updates.
- Find Japanese Language Pack in available optional updates.
- Install the language pack. Log off Windows then log on again so that the update takes effect.
Windows XP
- Click on Start, Settings then Control Panel.
- Click on Language, and Regional Options.
- Click the Regional Option tab, and then select Japanese from the drop-down menu to install.
- Click Advanced tab, and then select Japanese from the drop-down menu.
- Click OK and confirm changes. Restart PC so that the update takes effect.
Check all Japanese-related codes on the Advanced tab in Language, and Regional Options, or those may not be default on your OS. The main codes for Japanese is as following:
- MAC - Japanese
- Japanese Katakana Extended
- JIS X 0208-1990&0212-1990